Introduction
When coupling pipes and attaching pipes to components screwed fittings are often used as opposed
to compression couplings, soldered or welded connections. Historically in the UK, and throughout europe,
British Standard Pipe Threads (BSP)have been used . These threads are still widely used but the threads are generally no
longer identified as BSP threads ..
BS 21 has been used in the UK for BSP threads for pressure tight joints and BS 2779 has been used
for BSP threads which are not used for pressure tight joints. BS 21 has now been generally replaced
by BS EN 10226-1, and BS 2779 has been totally replaced by BS EN ISO 0228-1
BS 21 is still (2007) relevant for taper ext. /taper int. threads which are used
for pressure tight joints (until BS 10226-2 is issued) and for longscrew threads. Longscrew
threads are parallel threads used as longscrew connectors as specified in BS 1387 .
Using these components pressure tight joints are made my using soft annulus seals between a backnut and
a connector face.
Symbols
Note: all dimensions in mm
D = Major diameter of Internal Thread
D1 = Minor diameter of internal Thread = D -1,280654P
D2 = Pitch diameter of internal Thread = D - 0,640327P
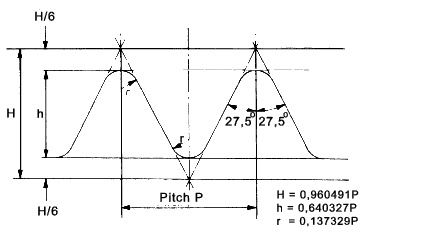
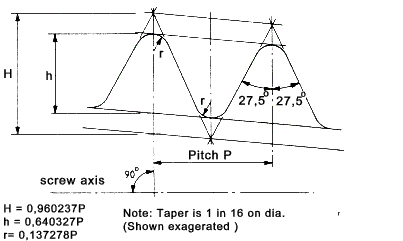
H = Height of fundamental triangle of thread form
h = height of thread profile with rounded crests and roots.
P = Pitch
r = radius of crest (and roots)
R = Designation of a taper external thread
Rp = Designation of a parallel internal thread
TD1 = Tolerance of minor diameter of internal thread
TD2 = Tolerance of pitch diameter of internal thread
|
T1 = Tolerance on gauge length of external thread
T2 = Tolerance pos'n of gauge length of int'l thread
A = tighter class tolerance of ext thread (BS EN 10228).
B = wider class tolerance of ext thread (BS EN 10228)
d = Major diameter of External Thread
d1 = Minor diameter of External Thread = D -1,280654P
d2 = Pitch diameter of External Thread = D - 0,640327P
La = Accommodation Length
Le = Useful thread length external threads
Li = Useful thread length internal threads
Td = Tolerance of major diameter of external thread
Td2 = Tolerance of pitch diameter of external thread
|
Reference Standards
BS 21:1985 :...Specification for pipe threads for tubes and fittings where pressure-tight joints are made on the threads (metric dimensions)..Part Superseded. This standard is applicable only for longscrew threads and Taper int/Taper ext thread combinations
BS EN 10226-1:2004 :..Pipe threads where pressure tight joints are made on the threads. Taper external threads and parallel internal threads. Dimensions, tolerances and designation ..Part Supersedes BS 21
BS 2779:1986 :...Specification for pipe threads for tubes and fittings where pressure-tight joints are not made on the threads (metric dimensions)..Superseded Withdrawn
BS EN ISO 228-1:2003 :...Pipe threads where pressure-tight joints are not made on the threads. Dimensions, tolerances and designation ..Supersedes BS 2779
BS EN ISO 228-2:2003 :...Pipe threads where pressure-tight joints are not made on the threads. Verification by means of limit gauges /
Note: Equivalent international Standards...
ISO 7-1:1994...Pipe threads where pressure-tight joints are made on the threads -- Part 1: Dimensions, tolerances and designation
ISO 7-2:2000...Pipe threads where pressure-tight joints are made on the threads -- Part 2: Verification by means of limit gauges..As yet there is
no English /European equivalent of this standard(BS EN 10226-2 is in preparation). In the UK the current equivalent standard is BS 21
Thread Designations.
BS EN ISO 0228 -1
When designating threads to this standard three blocks are require:
Block 1 (Pipe Thread):
Block 2 (International standard ref = ISO 228:
Block 3 G(size) for internal thread: or G ( size) A for external thread to class A: or G (size ) B for external thread class B
If the thread required is a left hand thread then LH should be appended
Example internal thread designation... Pipe Thread ISO 228 - G 3/4
Example External thread designation...Pipe Thread ISO 228 - G 3/4A
BS EN 10226-1
When designating threads to this standard three blocks are require:
Block 1 (Pipe Thread):
Block 2 (International standard ref = EN 10226:
Block 3 R(size) For external taper thread: or Rp ( size) For internal parallel thread
Example external taper thread designation... Pipe Thread EN10226 - R 3/4
Example parallel internal thread designation...Pipe Thread EN10226 - Rp 3/4
BS 21:1985
Taper external threads shall be designation with R followed by the size.
Taper internal threads shall be designation with Rc followed by the size.
Longscrew threads shall be designation with RL followed by the size.
Example external taper thread designation... Pipe Thread R 3/4
Example Internal taper thread designation... Rc 3/4
Example longscrew thread designation... RL 3/4
Terminology
Mostly applicable to taper thread assemblies....
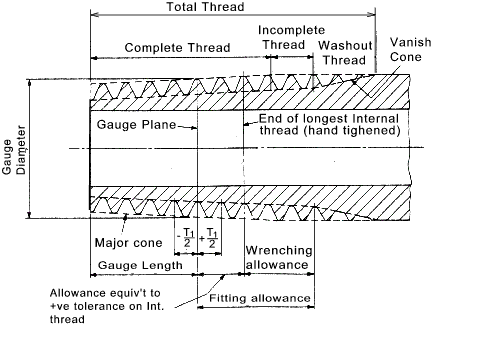
Gauge Diameter..Major diameter of Thread (Int and Ext) at gaugel plane.
Major Cone.. Imaginary cone on taper thread which touches the crest of all external threads or the roots of all internal threads.
Gauge plane..Plane on taper threads, which is perpendicular to the thread axis, at which the major cone has gauge diameter.
Gauge length.. On external threads the distance from the gauge plane to the small end of the thread.
Complete thread.. The thread which is full formed at both crest and root.
Washout thread.. Thread which is not full formed at the root.
Useful thread.. All thread excluding washout thread.
Assembly Length (Fitting Allowance)..Useful thread beyond the gauge plane on an external thread required to
provide an assembly with an internal thread at the upper limit of tolerance. It includes the wrenching allowance.
Wrenching Length (Wrenching Allowance)..Useful thread length provided to accommodate
the relative movement when wrenching from the hand tight position to the fully tightened position.
Accomodation length..Distance from the face of the internal thread to the first obstruction which the externally threaded component
will encounter on tightening....
BS EN ISO 0228 -Thread Sizes
This standard "Pipe threads where pressure-tight joints are not made on the threads." are whitworth form
threads for parallel fastening threads that are generally used for fastenings purposes in the mechanical
assembly of fittings including valves, accessories etc. Pressure tight joints are not made
on the threads but may be made by using the threads to compress together surfaces onto seals. The crests of the basic web form may be
truncated, within the limits in the last two columns of the table below, except when they are likely to be used in conjunction with an external taper
thread conforming to BS EN 10226. When the thread forms are not truncated they are
identical to the threads in BS EN ISO 0228

| Thread Size |
Threads per 25,4 mm
(No.Thds/inch) |
Pitch |
Height of Thread |
Major Dia |
Pitch Diameter |
Minor Diameter |
Int. Pitch Dia Tolerance
Lower /Upper |
Class A Ext.
Pitch Dia Tolerance
Lower /Upper |
Class B Ext.
Pitch Dia Tolerance
Lower /Upper |
Int. Minor
Dia Tolerance
Lower /Upper |
Ext. Major
Dia Tolerance
Lower /Upper |
| |
|
P |
h |
D = d |
D2 = d2 |
D1 = d1 |
TD2 |
Td2 class A |
Td2 class B |
TD1 |
Td |
| |
Thds. |
mm |
mm |
mm |
mm |
mm |
mm |
mm |
mm |
mm |
mm |
| 1/16" |
28 |
0,907 |
0,581 |
7,723 |
7,142 |
6,561 |
0 / +0,107 |
-0,107 / 0 |
-0,214 / 0 |
0 / +0,282 |
-0,214 / 0 |
| 1/8" |
28 |
0,907 |
0,581 |
9,728 |
9,147 |
8,566 |
0 / +0,107 |
-0,107 / 0 |
-0,214 / 0 |
0 / +0,282 |
-0,214 / 0 |
| 1/4" |
19 |
1,337 |
0,856 |
13,157 |
12,301 |
11,445 |
0 / +0,125 |
-0,125 / 0 |
-0,250 / 0 |
0 / +0,445 |
-0,250 / 0 |
| 3/8" |
19 |
1,337 |
0,856 |
16,662 |
15,806 |
14,95 |
0 / +0,125 |
-0,125 / 0 |
-0,250 / 0 |
0 / +0,445 |
-0,250 / 0 |
| |
| 1/2" |
14 |
1,814 |
1,162 |
20,955 |
19,793 |
18,631 |
0 / +0,142 |
-0,142 / 0 |
-0,282 / 0 |
0 / +0,541 |
-0,284 / 0 |
| 5/8" |
14 |
1,814 |
1,162 |
22,911 |
21,749 |
20,587 |
0 / +0,142 |
-0,142 / 0 |
-0,282 / 0 |
0 / +0,541 |
-0,284 / 0 |
| 3/4" |
14 |
1,814 |
1,162 |
26,411 |
25,279 |
24,117 |
0 / +0,142 |
-0,142 / 0 |
-0,282 / 0 |
0 / +0,541 |
-0,284 / 0 |
| 7/8" |
14 |
1,814 |
1,162 |
30,201 |
29,039 |
27,877 |
0 / +0,142 |
-0,142 / 0 |
-0,282 / 0 |
0 / +0,541 |
-0,284 / 0 |
| |
| 1" |
11 |
2,309 |
1,479 |
33,249 |
31,77 |
30,291 |
0 / +0,180 |
-0,180 / 0 |
-0,360 / 0 |
0 / +0,640 |
-0,360 / 0 |
| 1 1/8" |
11 |
2,309 |
1,479 |
37,897 |
36,418 |
34,939 |
0 / +0,180 |
-0,180 / 0 |
-0,360 / 0 |
0 / +0,640 |
-0,360 / 0 |
| 1 1/4" |
11 |
2,309 |
1,479 |
41,91 |
40,431 |
38,952 |
0 / +0,180 |
-0,180 / 0 |
-0,360 / 0 |
0 / +0,640 |
-0,360 / 0 |
| 1 1/2" |
11 |
2,309 |
1,479 |
47,803 |
46,324 |
44,845 |
0 / +0,180 |
-0,180 / 0 |
-0,360 / 0 |
0 / +0,640 |
-0,360 / 0 |
| |
| 1 3/4" |
11 |
2,309 |
1,479 |
53,746 |
52,267 |
50,788 |
0 / +0,180 |
-0,180 / 0 |
-0,360 / 0 |
0 / +0,640 |
-0,360 / 0 |
| 2" |
11 |
2,309 |
1,479 |
59,614 |
58,135 |
56,656 |
0 / +0,180 |
-0,180 / 0 |
-0,360 / 0 |
0 / +0,640 |
-0,360 / 0 |
| 2 1/4" |
11 |
2,309 |
1,479 |
65,71 |
64,231 |
62,752 |
0 / +0,217 |
-0,217 / 0 |
-0,434 / 0 |
0 / +0,640 |
-0,434 / 0 |
| 2 1/2" |
11 |
2,309 |
1,479 |
75,184 |
73,705 |
72,226 |
0 / +0,217 |
-0,217 / 0 |
-0,434 / 0 |
0 / +0,640 |
-0,434 / 0 |
| |
| 2 3/4" |
11 |
2,309 |
1,479 |
81,534 |
80,055 |
78,576 |
0 / +0,217 |
-0,217 / 0 |
-0,434 / 0 |
0 / +0,640 |
-0,434 / 0 |
| 3" |
11 |
2,309 |
1,479 |
87,884 |
86,405 |
84,926 |
0 / +0,217 |
-0,217 / 0 |
-0,434 / 0 |
0 / +0,640 |
-0,434 / 0 |
| 3 1/2" |
11 |
2,309 |
1,479 |
100,83 |
98,851 |
97,37 |
0 / +0,217 |
-0,217 / 0 |
-0,434 / 0 |
0 / +0,640 |
-0,434 / 0 |
| 4" |
11 |
2,309 |
1,479 |
113,03 |
111,551 |
110,072 |
0 / +0,217 |
-0,217 / 0 |
-0,434 / 0 |
0 / +0,640 |
-0,434 / 0 |
| |
| 4 1/2" |
11 |
2,309 |
1,479 |
125,73 |
124,251 |
122,772 |
0 / +0,217 |
-0,217 / 0 |
-0,434 / 0 |
0 / +0,640 |
-0,434 / 0 |
| 5" |
11 |
2,309 |
1,479 |
138,43 |
136,951 |
135,472 |
0 / +0,217 |
-0,217 / 0 |
-0,434 / 0 |
0 / +0,640 |
-0,434 / 0 |
| 5 1/2" |
11 |
2,309 |
1,479 |
151,13 |
149,651 |
148,172 |
0 / +0,217 |
-0,217 / 0 |
-0,434 / 0 |
0 / +0,640 |
-0,434 / 0 |
| 6" |
11 |
2,309 |
1,479 |
163,83 |
162,351 |
160,872 |
0 / +0,217 |
-0,217 / 0 |
-0,434 / 0 |
0 / +0,640 |
-0,434 / 0 |
BS EN 10226 - 1
Pipe threads where pressure tight joints are made on the threads. Taper external threads and parallel internal threads.
These threads are of Whitworth form and are used when pressure tight joints are made on the screw threads.
The joints include taper male threads with parallel female threads are found in BS EN 10226-1.
The joints made up of taper male in taper female threads are found in BS EN 10226-2. These threads are
used for piping joints including piping, valves and fittings.


| Thread Size |
Threads per 25,4 mm
(No.Thds/inch) |
Pitch |
Height of Thread |
Major Dia |
Pitch Diameter |
Minor Diameter |
Nominal Gauge Length Ext, Thd |
Gauge Length Tolerance Ext Thread |
No Useful Threads for basic gauge length |
Ass'y Length |
Gauge Length Tolerance Int Thread |
Equiv. Dia. Tol.
Parallel Threads
|
| |
|
P |
h |
D= d |
D2 = d2 |
D1 = D1 |
|
T1 /2 |
|
|
T2 /2 |
|
| |
Thds |
mm |
mm |
mm |
mm |
mm |
mm |
mm |
mm |
mm |
mm |
mm |
| 1/16 |
28 |
0,907 |
0,581 |
7,723 |
7,142 |
6,561 |
4 |
+ /-0,9 |
6,5 |
2,5 |
+ /- 1,1 |
+ /-0,071 |
| 1/8 |
28 |
0,907 |
0,581 |
9,728 |
9,147 |
8,566 |
4 |
+ /- 0,9 |
6,5 |
2,5 |
+ /- 1,1 |
+ /-0,071 |
| 1/4 |
19 |
1,337 |
0,856 |
13,157 |
12,301 |
11,445 |
6 |
+ /- 1,3 |
9,7 |
3,7 |
+ /- 1,7 |
+ /-0,104 |
| |
| 3/8 |
19 |
1,337 |
0,856 |
16,662 |
15,806 |
14,95 |
6,4 |
+ /- 1,3 |
10,1 |
3,7 |
+ /- 1,7 |
+ /-0,104 |
| 1/2 |
14 |
1,814 |
1,162 |
20,955 |
19,793 |
18,631 |
8,2 |
+ /- 1,8 |
13,2 |
5,0 |
+ /- 2,3 |
+ /-0,104 |
| 3/4 |
14 |
1,814 |
1,162 |
26,411 |
25,279 |
24,117 |
9,5 |
+ /- 1,8 |
14,5 |
5,0 |
+ /- 2,3 |
+ /-0,104 |
| |
| 1 |
11 |
2,309 |
1,479 |
33,249 |
31,77 |
30,291 |
10,4 |
+ /- 2,3 |
16,8 |
6,4 |
+ /- 2,9 |
+ /-0,180 |
| 1 1/4 |
11 |
2,309 |
1,479 |
41,91 |
40,431 |
38,952 |
12,7 |
+ /- 2,3 |
19,1 |
6,4 |
+ /- 2,9 |
+ /-0,180 |
| 1 1/2 |
11 |
2,309 |
1,479 |
47,803 |
46,324 |
44,845 |
12,7 |
+ /- 2,3 |
19,1 |
6,4 |
+ /- 2,9 |
+ /-0,180 |
|
| 2 |
11 |
2,309 |
1,479 |
59,614 |
58,135 |
56,656 |
15,9 |
+ /- 2,3 |
23,4 |
7,5 |
+ /- 2,9 |
+ /-0,180 |
| 2 1/2 |
11 |
2,309 |
1,479 |
75,184 |
73,705 |
72,226 |
17,5 |
+ /- 3,5 |
26,7 |
9,2 |
+ /- 3,5 |
+ /-0,216 |
| 3 |
11 |
2,309 |
1,479 |
87,884 |
86,405 |
84,926 |
20,6 |
+ /- 3,5 |
29,8 |
9,2 |
+ /- 3,5 |
+ /-0,216 |
| |
| 4 |
11 |
2,309 |
1,479 |
113,03 |
111,551 |
110,072 |
25,4 |
+ /- 3,5 |
35,8 |
10,4 |
+ /- 3,5 |
+ /-0,216 |
| 5 |
11 |
2,309 |
1,479 |
138,43 |
136,951 |
135,472 |
28,6 |
+ /- 3,5 |
40,1 |
11,5 |
+ /-3,5 |
+ /-0,216 |
| 6 |
11 |
2,309 |
1,479 |
163,83 |
162,351 |
160,872 |
28,6 |
+ /- 3,5 |
40,1 |
11,5 |
+ /- 3,5 |
+ /-0,216 |
BS 21:1985 - Notes
Specification for pipe threads for tubes and fittings where pressure-tight joints are made on the threads (metric dimensions)
This standard is currently only relevant to pressure tight joint between taper internal and taper external threads
and longscrew threads.
The parallel external threads on a longscrew thread shall be formed such that connectors and backnuts with threads
formed in accordance with the tables above shall run on the longscrew threads with not perceptible shake...
The sizes for longscrew threads are provided in the table above for
under the heading BS 10228.
The sizes for taper threads are provided in the
table under heading BS 10226:
The basic sizes of taper external threads are in accordance with the dimensions for BS 10226 as shown above. The basic
dimensions of taper external threads are also in accordance with the above standard the relevant tolerance are provided in the column
headed "Gauge Length Tolerance Int Thread - T2 /2"
|
