|
Introduction
The following notes are general guidance notes showing methods of
calculation of the strength and size of welds. Welded joints are often
crucially important affecting the safety of the design systems. It is
important that the notes and data below are only used for preliminary design
evaluations. Final detail design should be completed in a formal way
using appropriate codes and standards and quality reference documents
Relevant Standards
BS 5950-1:2000 ..Structural use of steelwork in building. Code of practice for design. Rolled and welded sections
BS EN 10025-1:2004 - Hot rolled products of structural steels. General technical delivery conditions
Variables related to welded joints
- Strength of deposited weld material
- Type of joint and weld..important
- Size of weld ..important
- Location of weld in relation to parts joined..important
- Types of stress to which the weld is subjected
- Conditions under which weld is carried out
- Type of equipment used for welding
- Skill of welder
|
Guidance Principles
A generous factor of safety should be used (3-5) and if fluctuating
loads are present then additional design margins should be included to allow for fatigue
Use the minimum amount of filler material consistent with the job requirement
Try to design joint such that load path is not not through the weld
The table below provides provides approximate stresses in, hopefully, a convenient
way.
For the direct loading case the butt weld stresses are tensile/ compressive σ t for the fillet welds
the stresses are assumed to be shear τ s applied to the weld throat.
For butt welded joints subject to bending the butt weld stresses result from a tensile/compressive stress σ b and a direct shear
stress τ s .
In these cases the design basis stress should be σ r = Sqrt (σ b2 + 4τ s2)
For Fillet welded joints subject to bending the stresses in the fillet welds are all shear stresses.
From bending τ b and from shear τ s
In these cases the design basis stress is generally τ r =Sqrt (τ b2 + τ s2)
The stresses from joints subject to torsion loading include shear stress from the applied load
and shear stresses from the torque loading. The resulting stresses should be added
vectorially taking care to choose the location of the highest stresses.
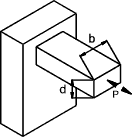
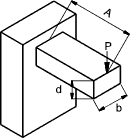
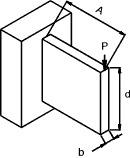
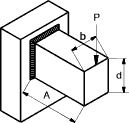
Table of bracket weld subject to direct and bending stresses
Assessment of Fillet Weld Groups ref notes and table Properties of Fillet Welds as lines
Important note: The methods described below is based on the simple method of calculation
of weld stress as identified in BS 5950- clause 6.7.8.2 . The other method identifed in BS 5950 - 1 clause 6.7.8.3
as the direction method uses the method of resolving the forces transmitted
by unit thickness welds per unit length into traverse forces (FT ) and
longitudinal forces (FL ). I have, to some extent,
illustrated this method in my examples below
The method of assessing fillet welds groups treating welds as lines is reasonably
safe and conservative and is very convenient to use.
a) Weld subject to bending....See table below for typical unit areas and unit Moments of Inertia
A fillet weld subject to bending is easily assessed as follows.
1) The area of the fillet weld A u..(unit thickness) is calculated assuming the weld
is one unit thick..
2) The (unit) Moment of Inertia I u is calculated assuming the weld
is one unit thick..
3) The maximum shear stress due to bending is determined...τ b = M.y/I u
4) The maximum shear stress due to direct shear is determined.. τ s = P /A
5) The resultant stress τ r = Sqrt (τ b2 + τ s2 )
6) By comparing the design strength p w with the resultant stress τ r the value of the weld throat thickness is calculated and then the weld size.
i.e. if the τ r /p w = 5 then the throat thickess t = 5 units
and the weld leg size h = 1,414t
a) Weld subject to torsion...See table below for typical unit areas and unit Polar moments of Inertia
A fillet weld subject to torsion is easily assessed as follows.
1) The area of the fillet weld A u (unit thickness) is calculated assuming the weld
is one unit thick
2) The (unit) Polar Moment of Inertia J u is calculated assuming the weld
is one unit thick..
The polar moment of inertia J = I xx + I yy
3) The maximum shear stress due to torsion is determined...τ t = T.r/J u
4) The maximum shear stress due to direct shear is determined.. τ s = P /A u
5) The resultant stress τ r is the vector sum of τ t and τ s. r is chosen to give
the highest value of τ r
6) By comparing the design strength p w with the resultant stress τ r the value of the weld throat thickness is calculated and then the weld size.
i.e. if the τ r /p w = 5 then the throat thickess t = 5 units
and the weld leg size h = 1,414.t
Examples of Fillet Weld Calculations
|
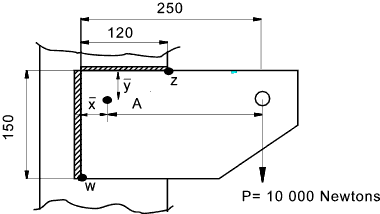
Example of Weld in Torsion..

P = Applied load = 10 000N
P w = Design Strength = 220 N/mm 2 (Electrode E35 steel S275) Design Strength
b = 120mm.
d = 150 mm
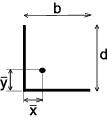
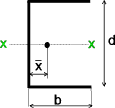
x = b2 / 2(b+d) = 27mm.. (From table below)
y = d2 / 2(b+d) = 42mm..(From table below)
|
Simple Method as BS 5950 clause 6.8.7.2
..The vector sum of the stresses due to forces and moments should not exceed the design
strength Pw
A u = Unit Throat Area
= (From table below) b + d = (120 + 150) = 270mm2
To obtain radius of Force from weld centre of gravity
A = 250-27 =223mm
Moment M = P.r = 10000.223 = 2,23.106 N.mm
J u = [(b+d)4 - 6b2d2] /12 (b+d) = 1,04.106..(From Table)
It is necessary to locate the point subject to the highest shear stress..For a weld subject to only torsion
this would be simply at the point furthest from the COG. However because the weld is subject to
torsion and direct shear the problem is more complicated. A normal method of
determining the stresses in these cases is to use vector addition.
It is generally prudent to calculate the total shear stress at both positions, using the method below,
and select the highest.. For this example the method used is to resolve the stresses
in the x and y directions
First considering point Z
Horizontal distance from centroid r zh = 120-27= 93mm
Vertical distance from centroid r zv = 42mm
The vertical stress τ v = τ sv + τ tv
τ sv = P /A u = 10000/270 = 37 N/mm2
τ tv = M.r zh /J u = 2,23.106.93/1,04.106 = 199 N/mm2
τ v = 236,45 N/mm2
The horizontal stress τ h = τ sh + τ th
τ sh = 0
τ th = M.r zv /J u = 2,23.106.42/1,04.106 = 90 N/mm2
τ h = 90 N/mm2
The resultant stress on the weld at z
τ r = Sqrt (τ h2 + τ v2) = 253 N/mm2
Now considering point w
Horizontal distance from centroid r wh = 27mm
Vertical distance from centroid r wv = 150-42= 108mm
The vertical stress τ v = τ sv - τ tv
τ sv = P /A u = 10000/270 = 37 N/mm2
τ tv = M.r wh /J u = 2,23.106.27/1,04.106 = 57,9 N/mm2
τ v = 20,86 N/mm2
The horizontal stress τ h = τ sh + τ th
τ sh = 0
τ th = T.r wv /J u = 2,23.106.108/1,04.106 = 231,6 N/mm2
τ h = 231,6 N/mm2
The resultant stress on the weld at w
τ r = Sqrt (τ h2 + τ v2) = 232,5 N/mm2
The maximum stress is similar but greatest at z ....
The design strength p w for the weld material is 220 N/mm 2
The weld throat thickness
should be 253 /220 = 1,15mm .
The weld size is therefore 1,414. 1,15 = 1,62mm use 3mm fillet weld
|
Direction Method as BS 5950 clause 6.8.7.3
L = Length of weld 1 unit thick =
(From table below) b + d = (120 + 150) = 270mm
To obtain radius of Force from weld Centre of Gravity (Cog) .
A = 250-27 =223mm
Moment M = P.r = 10000.223 = 2,23.106 N.mm
Ju = Polar Moment of inertia for weld 1unit(mm) thick.
= [(b+d)4 - 6b2d2] /12 (b+d) = 1,04.106 mm4 /mm..(From Table)
It is necessary to locate the point subject to the highest shear stress..For a weld subject to only torsion
this would be simply at the point furthest from the COG. However because the weld is subject to
torsion and direct shear the problem is more complicated. A normal method of
determining the stresses in these cases is to use vector addition.
It is generally prudent to calculate the total shear stress at both positions, using the method below,
and select the highest.. For this example the method used is to resolve the stresses
in the x and y directions
First considering point Z
Horizontal distance from centroid r zh = 120-27= 93mm
Vertical distance from centroid r zv = 42mm
The vertical force /mm run F v = F sv + F tv
F sv = P /L = 10000/270 = 37 N/mm run
F tv = M.r zh /J u = 2,23.106.93/1,04.106 = 199 N/mm run
F v = 236,45 N/mm run
The horizontal force /mm run for unit(mm) weld width F h = F sh + F th
F sh = 0
F th = M.r zv /J u = 2,23.106.42/1,04.106 = 90 N/mm run
F h = 90 N/mm run
The resultant force on the weld/mm run at z
F r
= Sqrt (F h2 + F v2)
= 253 N/mm run
Now considering point w
Horizontal distance from centroid r wh = 27mm
Vertical distance from centroid r wv = 150-42= 108mm
The vertical forces per mm run F v = F sv - F tv
F sv = P /L = 10000/270 = 37 N/mm run
F tv = M.r wh /J u = 2,23.106.27/1,04.106 = 57,9 N/mm run
F v = 20,86 N/mm run
The horizontal force /mm run = F h = F sh + F th
F sh = 0
F th = M.r wv /J u = 2,23.106.108/1,04.106 = 231,6 N/mm run
F h = 231,6 N/mm run
The specific force on the weld at w
F r = Sqrt (F h2 + F v2) = 232,5 N/mm run
The maximum specific is greatest at z = 253 N/mm run....
Referring to weld capacities for longitudinal stresses PL for fillet welds Capacities of Fillet Welds
the weld capacity for a 3mm weld with and E35 Electrode S275 Steel is 462N /mm run. This weld would be more than sufficient.
|
|
|
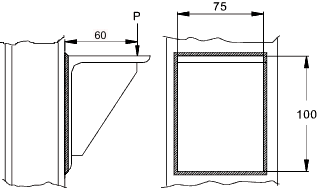
Example of Weld in Bending..

P= 30000 Newtons
d= 100mm
b= 75mm
y = 50mm
Design Stress p w = 220 N/mm 2 (Electrode E35 steel S275) Design Strength
Moment = M = 30000*60=18.10 5 Nmm
|
Simple Method as BS 5950 clause 6.8.7.2
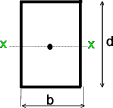
Unit Weld Area = A u = 2(d+b) =2(100+75) =350mm 2
Unit Moment of Inertia = I u
= d 2(3b+d) / 6 = 100 2 (3.75 +100) / 6 =5,42.105
mm4
τ r = Sqrt(τ s2 + τ b2)
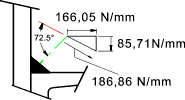
τ s = P / A u = 30000/350 = 85,71 N/mm 2
τ b = M.y / I u = 18.105 . 50 / 5,42.105
= 166,05 N/mm 2
τ r = Sqrt(85,71 2 + 166.052) =186,86 N/mm2
τ r / p w = 186,86 / 220 = 0,85 = Throat Thickness.....
( Throat thickness for τ = 220 N/mm2 )
Leg Length = Throat thickness *1,414 = 1,2mm use 3mm weld thickness
Note : If a leg length h= 1,2mm is used in the equations in relevant
part of the "Table of bracket weld subject to direct and bending stresses" above
a value of τ b = 198 N/mm and a value
of τ s = 100 N/mm2 results with a resultant
stress of Sqrt (τ b2 + τ s2)
= 222N/mm2..Which is in general
agreement with the above result
|
Direction Method as BS 5950 clause 6.8.7.3
Length of Weld of unit thickness = L = 2(d+b) =2(100+75) =350mm
Moment of Inertia / mm throat thickness = I u / mm
= d 2(3b+d) / 6
= 100 2 (3.75 +100) / 6 =5,42.105
mm 4 / mm
F r = Resultant force per unit length of weld.
F s = Shear force per unit length of weld.
F b = Bending force per unit length of weld.
F r = Sqrt(F s2 + F b2)
F s = P / L = 30000/350 = 85,71 N per mm length of weld
F b = M.y / I u
= 18.105 . 50 / 5,42.105
= 166,05 N per mm length of weld
F r = Sqrt(85,71 2 + 166.052) =186,86 N per mm length of weld.
For this case for the welds under greatest loading the type of loading is traverse loading.
The bending stress is in line with horizontal element and the shear stress is in line with vertical member.
The angle of the resulting specific load to the horizontal element
= arctan(85,71/166,5)= 27,5o.
This is an angle with the weld throat θ = 45o + 27,5o = 72,5o
Referring to weld capacities table below.Weld Capacities K is calculated at 1,36 for this resultant direction of forces.
PT = a.K.pwfor a E35 Weld electrode
used with S275 steel
pw = 220 N/mm2 and therefore PT = a*300N/mm2..
A 3mm weld (a = 2,1mm) therefore will therefore have a design capacity of 630 N/mm run and will easily be able to
support the load of 186,86 N per mm run

|
|
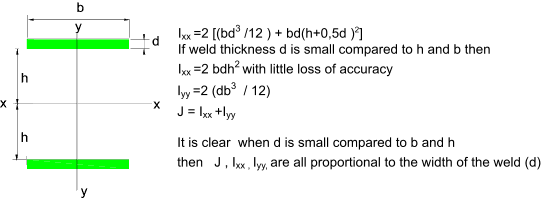
Properties of weld groups with welds treated as lines -
It is accepted that it is reasonably accurate to use properties based on
unit weld thickness in calculation to determine the strength of welds as shown in the examples on
this page. The weld properties Ixx Iyy and J are assumed
to be proportional to the weld thickness. The typical accuracy of this method of
calculation is shown below...

This is illustrated in the tabled values below
| |
d |
b |
h |
Ixx |
Iyy |
J= Ixx +Iyy |
| Accurate |
3 |
60 |
50 |
955080 |
108000 |
1063080 |
| Simple |
3 |
60 |
50 |
900000 |
108000 |
1008000 |
| Error |
|
|
|
6% |
0 |
5% |
Note: The error identified with this method is lower as h increases
relative to d. This error is such that the resulting designs are conservative.
Example illustrating use of stress vectors

Calculation based on real weld sizes
1) The area of the welds
(based on throat weld thickness at 0,707.5 = 3,5mm)
Area = (57.3,5 + 2.55.3,5) = 584,5mm2
2) The moment of area about x-x =
M of Area = (57.3,5.3,5/2 + 2.55.3,5.(27.5 + 3,5)) = 12 284mm3
3) The centroid v = Moment of Area/Area
M of Area / Area = 21 mm
4) The radii rA, rB, rC & rD are calculated ..
rA = rB = Sqrt ((58,5-21)^2 + 28,5^2 ) = 47,1
rC = rD = Sqrt ((21)^2 + 28,5^2 ) = 35,40...
5) The angles θA, θB, θC & θD are calculated ..
θA = θB = tan-1 ((58,5-21)/ 28,5 ) = 52,7o
θC = θD = tan-1 ((21)/28,5 ) = 36,4o...
6) The direct shear stress on the area = Force /Area
τ S = 5000/584 = 8,56 N/mm2
7) The Moment on the weld group = Force.Distance to centroid
M = 5000.(100+21) = 6,05.105Nmm
8) The polar moment of inertia of the weld group = J = Ixx + Iyy
Iyy = 2.[55.3,53 /12 + 3,5.55.(50/2 + 3,5/2)2]
+ 573.3,5/12 = 3,3.105mm4
Ixx = 2.[553.3,5/12 + 3,5.55.(55/2 + 3,5 - 21)2]
+ 3,5357 / 12 + 3,5.57.(21-3,5/2)2 = 2,097 .105mm4
J = Ixx +Iyy= 5,4.105mm4
9) The stress due to torsion
τ TA =
τ TB = M.rA/J.. and ..τ TC =
τ TD = M.rC/J
τ TA = 6.055Nmm.47,1mm / 5,4.105mm4=52,8 N/mm2
τ TC = τ TD = 6.055Nmm.35,4mm / 5,4.105mm4= 39,70N/mm2
10) The resultant stresses τ RA, = τ RB and τ RA, = τ RB
are obtained
by adding the stress vectos graphically as shown below
τ RA = τ RB=46,29 N/mm2
τ RC = τ RD = = 45,31N/mm2
|
Calculations based on unit values
This calculation uses equations from table below
for Area, centroid, and Ju
1) Area of weld = 0,707.5.(2b+d)
Area = 0,707.5.(2.55 + 50) = 565.6mm2
2) There is no need to calculate the Moment of Area with this method
3) The centroid v = b2 /(2b+d)
v = 552/(2.55+50)= 18,9mm
4) The radii rA, rB, rC & rD are calculated ..
rA = rB = Sqrt ((55-18,9)^2 + 25^2 ) = 43,9
rC = rD = Sqrt (18,9^2 + 25^2 ) = 31,34
5) The angles θA, θB, θC & θD are calculated ..
θA = θB = tan-1 ((55-18,9)/ 25 ) = 55,29o
θC = θD = tan-1 ((18,9)/25 ) = 37o...
6) The direct shear stress on the area = Force /Area
τ S = 5000/565,5 = 8,84 N/mm2
7) The Moment on the weld group = Force .distance to centroid
M = 5000.(100+18,9) = 5.94.105Nmm
8) The Unit Polar moment of inertia of the weld group =
Ju = 0.707.5.(8.b3 +6bd2+d3)/12 + b4/(2b+d)
Ju = 0,707.5.(8.553+6.55.502 + 503)/12 - 553/(2.55+50) = 4,69.105
9) The stress due to torsion
τ TA =
τ TB = M.rA/J.. and ..τ TC =
τ TD = M.rC/J
τ TA = 5,94.105Nmm.43,9mm / 4,69.105mm4=55,6 N/mm2
τ TC = τ TD = 5,945Nmm.31,34mm / 4,69.105mm4= 39,69N/mm2
10) The resultant stresses τ RA, = τ RB and τ RA, = τ RB
are obtained
by adding the stress vectos graphically as shown below
τ RA = τ RB=48,59 N/mm2
τ RC = τ RD = 45,56N/mm2
|

Note: The example above simply illustrates the vector method adding direct and torsional shear stresses and compares the difference
in using the unit weld width method and using real weld sizes. The example calculates the stress levels in an existing weld group
it is clear that the weld is oversized for the loading scenario. The difference in the resulting values are in less than 4%. If the welds were smaller
i.e 3mm then the differences would be even smaller.
Table properties of a range of fillet weld groups with welds treated as lines -
Table Of Weld Capacities
The fillet weld capacity tables related to the type of loading on the weld. Two
types of loading are identified traverse loading and longitudinal loading as show below

The weld loading should be such that
{ (FL/PL) 2 + (FT/PT) 2 } ≤ 1
The following table is in accord with data in BS 5950 part 1. Based on
design strengths as shown in table below ... Design Strength
PL = a.pw
PT = a.K.pw
a = weld throat size.
K =1,25 √ (1,5 / (1 + Cos 2 θ )
PT based on elements transmitting forces at 90o i.e θ = 45o and K = 1,25
| Weld Capacity E35 Electrode S275 Steel |
|
Weld Capacity E42 Electrode S355 Steel |
| Leg Length |
Throat Thickness |
Longitudinal Capacity |
Transverse Capacity |
Leg Length |
Throat Thickness |
Longitudinal Capacity |
Transverse Capacity |
| P L(kN/mm) |
P T (kN/mm) |
P L |
P T |
| mm |
mm |
kN/mm |
kN/mm |
mm |
mm |
kN/mm |
kN/mm |
| 3 |
2,1 |
0,462 |
0,577 |
3 |
2,1 |
0,525 |
0,656 |
| 4 |
2,8 |
0,616 |
0,720 |
4 |
2,8 |
0,700 |
0,875 |
| 5 |
3,5 |
0,770 |
0,963 |
5 |
3,5 |
0,875 |
1,094 |
| 6 |
4,2 |
0,924 |
1,155 |
6 |
4,2 |
1,050 |
1,312 |
| 8 |
5,6 |
1,232 |
1,540 |
8 |
5,6 |
1,400 |
1,750 |
| 10 |
7,0 |
1,540 |
1,925 |
10 |
7,0 |
1,750 |
2,188 |
| 12 |
8,4 |
1,848 |
2,310 |
12 |
8,4 |
2,100 |
2,625 |
| 15 |
10,5 |
2,310 |
2,888 |
15 |
10,5 |
2,625 |
3,281 |
| 18 |
12,6 |
2,772 |
3,465 |
18 |
12,6 |
3,150 |
3,938 |
| 20 |
14,0 |
3,08 |
3,850 |
20 |
14,0 |
3,500 |
4,375 |
| 22 |
15,4 |
3,388 |
4,235 |
22 |
15,4 |
3,850 |
4,813 |
| 25 |
17,5 |
3,850 |
4,813 |
25 |
17,5 |
4,375 |
5,469 |
Design Strength p w of fillet welds
| | Electrode classification |
| Steel Grade | 35 | 43 | 50 |
| N/mm2 | N/mm2 | N/mm2 |
| S275 | 220 | 220 | 220 |
| S355 | 220 | 250 | 250 |
| S460 | 220 | 250 | 280 |
|
