| These Pages include various standards. To confirm the status of any standard, identify the replacement standard if it is obsolete and/or purchase the standard please use. It is also possible to become a BSI member and obtain copies of the Standards at much reduced prices. |
Keyways Index
Key /Spline Strength Calculations
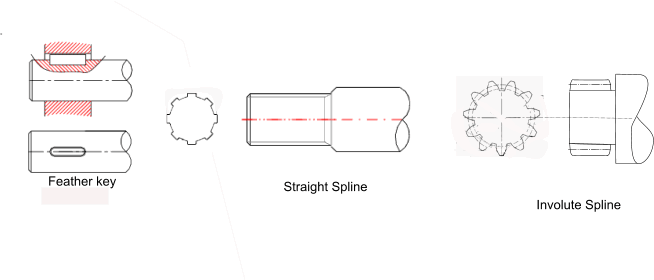
Introduction..... Types of coupling...... Shaft strength...... Keys...... Straight Spline...... Involute Spline...... Example Calculations......
|
Introduction The following notes indicate how to calculate a reasonable value for the stress resulting from
an applied torque. The calculation includes adjustment for the operating conditions by including a Service
factor Ks . This factor is based on a design factor Kd, an application
factor Ka , a load distribution factor Km, a fatigue life factor Kf, and a
wear life factor Kw.
The latter factor primarily related to splines. Machinerys Handbook (27th ed.) includes tables for allowable stresses for splines.
The allowable compressive stresses indicated are very low compared to the stresses indicated on this site (10%).
The links below to the Zakgear Calculator and Wikipedia also show the same tables. These documents are based of the article
�When Splines Need Stress Control� by Darle W. Dudley". The different calculation methods should result in the same
Safety Factors if the same interpretation of a fixed and a flexible coupling is used and if the design factor Kd is correctly applied
The method used by Dudley involves use of a separate equation for a flexible coupling and fixed coupling and does not
use a factor Note: Tables of the various factors and design strengths are found on webpage. Factors. Types of Coupling covered on this page Shaft Capacity It is first good practice to estimate the torque which can be transmitted by the reduced shaft diameter i.e the diameter of the shaft which is not including the depth of the key /spline. Note: Tables of the various factors and design strengths are found on webpage. Factors.
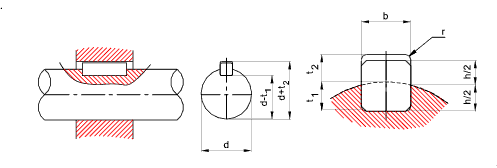
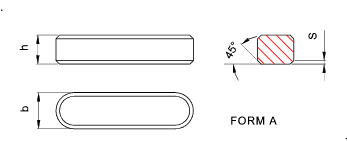
Key Capacity Notes: Tables of the various factors and design strengths are found on webpage. Factors. To determine the torque capacity of key..
Note: The stress in the hub need only be considered if the hub material design strength is significantly lower than the shaft or key strength.
ISO straight sided Spline Capacity Notes: Tables of the various factors and design strengths are found on webpage. Factors.
ISO straight involute Spline Capacity Notes: Tables of the various factors and design strengths are found on webpage. Factors.
Example calculations Three example calculations are provided below all based on the same transmitted power and RPM .
The keys and splines are all assumed to be close fits and guided. I have obtained the various factors
and material strengths using the tables on webpage Factors
These calculations are also completed using Mitcalc comparing the approximate methods as indicated on
this page with more accurate methods . Initial data
Factors
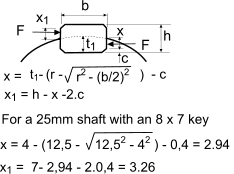
Shaft Calculation Do : Assuming a basic shaft size of 25mm . τ = 16.T . Ks / (π.Do3 ) =41,5 MPa (F of Safety (Ss /τ ) of about 4,8) Key Calculation A key of 8 mmx 7mm by 70mm long is selected. Le The effective length of the key = 70-2*4 = 62mm = The shear stress in the reduced shaft dia (Di) = τ = 16.T . Ks / (π.Di3 ) = 16 . 63,67 . 1000. 2 / (π . 213 . ) = 70,02 MPa ........ (F of Safety (Ss /τ ) of about 2 ,8) using Mitcalc σc = 70 MPa The compressive stress in the key and the shaft. This is the worst case stress in this example σc = T . Ks /( Le.(D/2).x) = 63,67 . 1000 . 2 . 2 / (62 . 25. 2,94 ) = 55,83 MPa .... (F of Safety (Sc /σ ) of about 2,33) using Mitcalc σc = 58,5 MPa Straight Spline Calculation A straight spline of 25 - 6x21x25 is selected. This has a OD of 25 mm The shear stress in the reduced shaft dia (Di) = τ = 16.T . Ks / (π.Di3 ) = 16 . 63,67 . 1000 . 2 /( π . 213 ) = 70,02 MPa ........ (F of Safety (Ss /τ )of about 2 ,8) using Mitcalc σc = 70 MPa The compressive stress in the spline and the shaft. This is the worst case stress in this example σc = T . Ks /( Le.n.r.y) = 63,67 . 1000 . 2 /( 25 . 6 . 11,5 . 1,4 ) = 52,72 MPa .... (F of Safety (Sc /σ c ) of about 2,47) using Mitcalc σc = 52,7 MPa Involute Spline Calculation An involute spline of 25 - 1 x 24 is selected. This has a OD (Dee ) of 25 mm a PCD ( D ) = 24mm , a module (m) of 1, Number of teeth z = 24 z : Number of teeth = 24 The chamfer radius (c) on the teeth is assumed to be about c = 0,3mm. Th resulting effective depth of the teeth (y) = ((D- Di)/2 -2.h = 1,4mm The shear stress in the reduced shaft dia (Di) = τ = 16.T . Ks / (π.Die3 ) = 16 . 63,67 . 1000 . 2 / (π . 22,53 ) = 56,9 MPa.... (F of Safety (Ss /τ )of about 3,51) using Mitcalc τ = 56,9 MPa The shear stress in the spline teeth. τ = 4 . T . Ks /(L.z.t.D) = 2. 63,67 . 1000 . 2 /( 10 . 24 . 1,57 . 24 ) = 56,28 MPa ..... (F of Safety (Ss /σ ) of about 3,55) The compressive in the spline teeth. σc = 2 .T . Ks /(L.z.h.D) = 2 . 63,67 . 1000 . 2 /( 10 . 24 . 0,9 . 24 ) = 49,12 MPa ..... (F of Safety (Sc /σc; ) of about 2,65) using Mitcalc σc = 46,3 MPa |
Sites Providing Relevant Information
|
|


