Introduction
These notes attept to clarify the meanings of the supplimentary
symbols used for geometric tolerancing. The notes are outline in nature.
Detailed notes are found in the identified standards and it is suggested that these standards
are consulted for clearest understanding of the requirements.
Reference Standards
BS ISO 1101:1983 Technical Drawings - Geometrical tolerancing - Tolerancing of form, orientation,
location and run-out - Generalities, definitions, symbols, indications on drawings
BS ISO 5459:1981 Technical Drawings - Geometrical tolerancing - Datums and datum-systems for geometrical tolerances
BS EN ISO 2692:2006 Geometrical product specifications (GPS) � Geometrical tolerancing �Maximum material
requirement (MMR), least material requirement (LMR)and reciprocity requirement (RPR)
BS ISO 8015:1985,Technical drawings � Fundamental tolerancing principle
BS ISO 10579:1985,Technical drawings -Dimensioning and tolerancing Non-rigid parts
Notation
Note: The following descriptions are very much shortened versions of those found in the standards
and are not considered to be definitive.
CM: Common zone, Applying single set of geometrical tolerances to a number of separate features
DTI:Datum target indication. Used when defining a reference surface using one or more daturm target features
LMC: Least material condition of a component at that limit of size where the material of
the feature is at its minimum everywhere, e.g. maximum hole diameter and minimum shaft diameter
LMS: The dimension defining the least material condition of a feature.
LMVS :The size generated by the collective effect of the least material size, LMS,
of a feature and the geometrical tolerance (form, orientation or location).
LMVC: Least material virtual condition. The condition of a component
of least material virtual size.
LMR: Least material requirement, defining a geometrical feature of the same type
and of perfect form, with a given dimension equal to LMVS, which limits a
a feature on the inside of the material e.g wall thickness.
MMS :Maximum material size; The size of the maximum material condition.
MMVC:Maximum material virtual condition, is a perfect form condition of the feature.
MMVS:Maximum material virtual size, is the size generated by the collective effect of the maximum material size,
MMS, of a feature of size and the geometrical tolerance (form, orientation or location) given for the derived feature of the same feature of size
NOTE 1 Maximum material virtual size, MMVS, is a parameter for size used as a numerical value connected to MMVC.
PJ: Projected tolerance zone. A geometric tolerance zone which projects from an actual design features such as a hole
MMR,Maximum material requirement; The identified requirement for a feature of size,
defining a geometrical feature of the same type and of perfect form, with a
given value for the intrinsic characteristic (dimension) equal to MMVS, which
limits the non-ideal feature on the outside of the material. This parameter is used to
control the assembleability of the components.
Maximum Material Requirement
The minimum assembly clearance occurs when each of the mating componentsis at its
maximum material size (e.g. the largest pin size and the smallest hole size) it additionally
occurs when the geometrical deviations e.g. the form,
orientation and location deviations of the components size and their derived features
centre line surface form are also at their maximum. Assembly clearance
are maximised when the sizes of the assembled features of size are at least material size
e.g. the smallest shaft size together with the largest hole size and when the geometrical
variations e.g. the form, orientation and location deviation and their derived features
are at zero. If the size of one mating part is less than its maximum
material size, the indicated geometrical tolerance of the feature may be increased
without endangering the assembly to the other part. This assembly
function is controlled by the maximum material requirement.
The maximum metal requirement is that the component boundaries
should not violate the maximum metal virtual condition of the perfect form at the
size meeting the maximum metal requirement e.g largest external or
smalles hole dia of fullest external form.
When the maximum metal condition symbol (M) (in circle) when used in
the tolerance frame,
it is indicated by a symbol placed after
- the tolerance value
- the datum letter
- or both

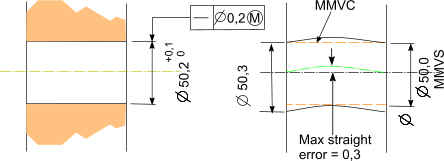
With maximum material requirement, the two
requirements (size and geometrical tolerance) are transformed into one collective
requirement. In the figure below the shaft is required to be perfectly
straight at maximum metal condition. If the shaft was at its
lower limit of size then it is acceptable that the shaft is allowed to be 0,5mm
out in straightness.

In the figure below maximum metal requirement is with a 0,5mm allowance. If the shaft was at its
lower limit of size then it is acceptable that the shaft is allowed to be 1,0mm out in straightness. At the upper limit of size the
shaft is allowed to be 0,5mm out in straighness.

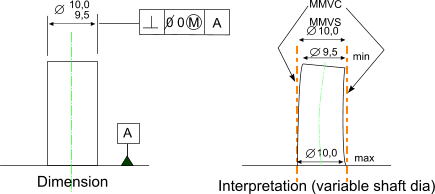
In the figure below maximum metal virtual condition is with a 0 mm allowance. A cylinder of
10mm dimeter must be at 90o to the basplate with no angular allowance. A cylinder of 9,5mm diameter
may be out of vertical be 0,5mm over its length. Also a cylinder of variable diameter
(within its tolerance) can be out of vertical only such that it does not violate MMVC
with a MMVS = 10mm dia at 90o to the plate.

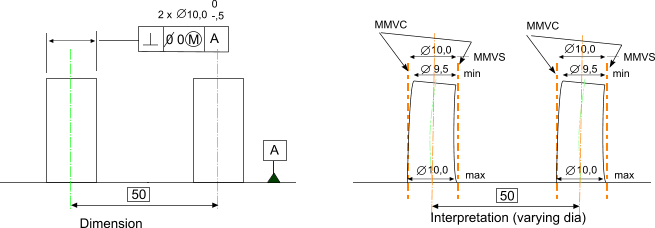
If the intended function of the a part a shown below
is an assembly with a plate with two holes 50 mm apart.
The holes are required to be perpendicular to the contact surface
of the plate then the pins are dimensioned as follows.

The maximimum metal requirement is applied to holes in a similar way as shown below.

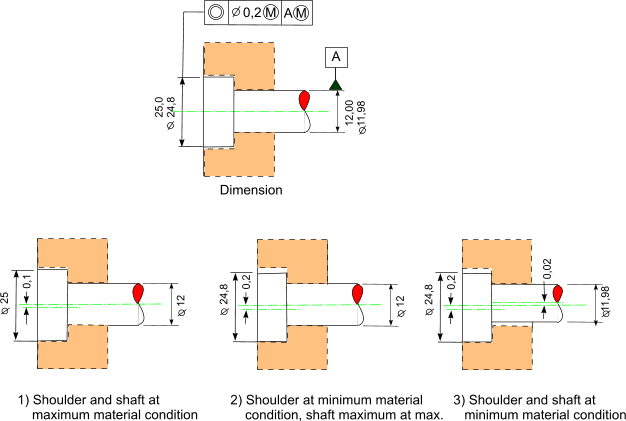
An example of the application of maximum material requirement to coaxiality is illustrated
in the figure below

Least Material Requirement
The least material requirement shall be indicated by the specification modifier symbol  .
When the least metal requirement symbol is used in
the tolerance frame,
it is indicated by a symbol placed after .
When the least metal requirement symbol is used in
the tolerance frame,
it is indicated by a symbol placed after
- the tolerance value
- the datum letter
- or both

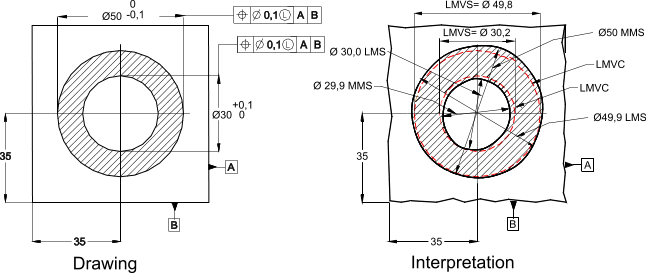
This requirement is generally used to limit the least material situation
e.g. when it is necessary to limit the minimum wall thickness between a hole and the side
or the outside diameter of a component. An example of dimensioning which includes least metal
requirements is provided in the figure below.

Theoretically exact dimensions
The dimension
determining the theoretically exact form, orientation or position respectively must not be toleranced.
The corresponding actual dimensions may only vary by the tolerances of form, orientation or position specified
within the tolerance frame.This is illustrated in the figure below

Projected tolerance zones
In some cases, the tolerance of orientation and position shall apply not to the feature itself but to the
external projection of it. Such projected tolerance zones shall be indicated by the symbol P (in circle)

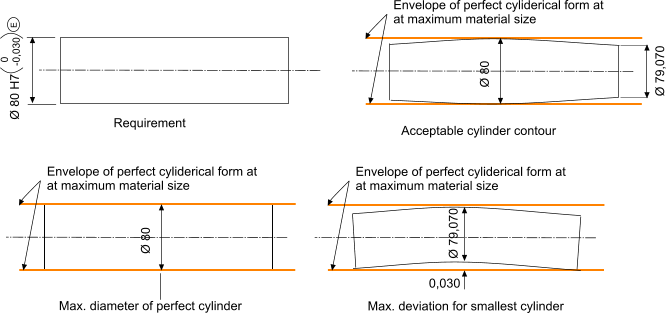
Envelope requirement (ref BS ISO 8015 clause 6,1
For a component feature e.g a cyliderical surface or a feature based on
two parallel plane surfaces, the envelope requirement may be used. This means
the the envelope form at maximum material condition shall not be violated. This is indicated by
a symbol  . .
This requirement is illustrated by the following simple example

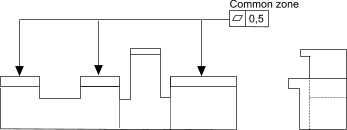
Common zone
it is possible to apply a single tolerance zone to several separate
features. An example of this is if a machine tool has separate surfaces
which have all to be made with a common flatness tolerance. This example is
shown below. In the tolerance frame the symbol CZ is added as the standard abbreviation for
"common zone".

Datum Targets
When surfaces are identified as datum faces there is the problem that
real surfaces vary significantly from ideally flat surfaces. Using a
real surface as datum face can result in poor repeatability of measurements.
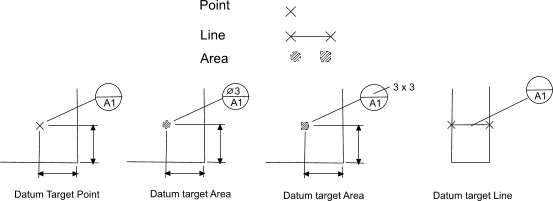
For these situations datum targets may be used. A daturm target may be a
point, a line or a defined local surface. If one datum surface is to be
identified then three surface identifiers are require. For two adjacent
normal surfaces then three datum targets are required on the primary surface and
two are required on the secondary surface. If three adjacent normal
surfaces are to be identified then three datum targets are required on the primary
surface and two are required on the secondary surface and one is required on
the tertiary surface.

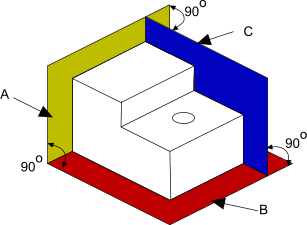
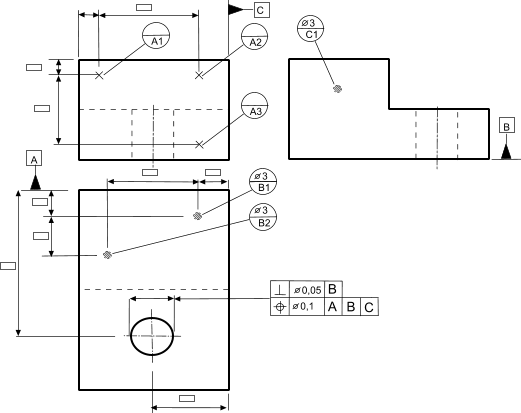
The figure below provides a crude example of a block with three datum faces to be
identified and a hole which is provided with geometrical tolerances relative to the three
datum faces

The figure illustrates the representative drawing . The datum face A is identified with the three
datum points A1,A2,A3,. The datum face B is positioned using the two datum circular areas B1 and B2.
The datum surface C
is positioned using the datum circular daturm surface C1

Free State
In BS ISO 10579 a non-rigid part is defined as a part which deforms to an
extent that in the free state is beyond the dimensional and/or geometrical tolerances on
the drawing. This condition applies to parts made of elastic or plastic
materials or of thin flexible materials.
The free state condition of a part is
when it is not restrained and subject only to the force of gravity.
The distortion of such a part should be such that if will be brought within the specified
tolerances for verification at assembly or by assembly using forces expected under the normal
assembly conditions.
Drawings of non-rigid parts should include ;
An identification of the standard BS ISO 10579 in the notes
section
A note identifying the conditions providing the restraint in the assembled conditions
when the drawing requirements apply
Geometrical variations allowed in the free state with a modifying  in the tolerance frame. in the tolerance frame.
A note identifying the condition of the free state e.g orientation
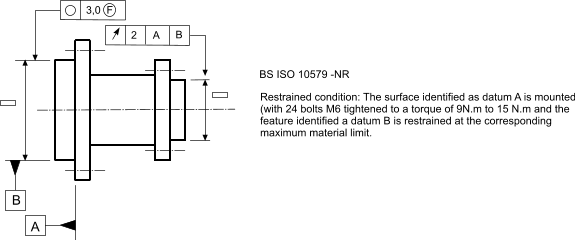
A crude example of how a free state geometrical tolerance is applied is provided in the figure below.
The interpretation of this figure is that the tolerances followed by  shall apply in the free state. The other tolerances apply in the assembled condition

<
| 

